Adding Shells |
  
|
Adding Shells |
|
As was the case with Nodes and Members, Shells can be added to a model in at least a few ways.
Adding Shells Graphically:
With a grid displayed on the screen, click Create > Shells. Notice that the cursor changes to a pen.
Hover over the grid and notice the triangle that tracks the pen movements and automatically snaps to grids. Note that the Status Bar displays the X, Y and Z coordinates of every location where the cursor snaps to the grid. This is useful for orientation.
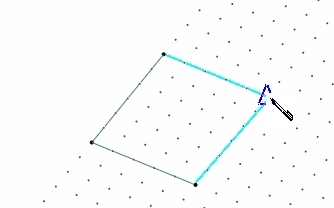
•To add a shell, just click anywhere on the grid and then move the cursor to see that a dark, bold dot remains at the click location and that a blue line stretches from the first click location to the cursor location.
•That dark, bold dot is the first node of the shell.
•Move in a counter-clockwise direction and click a second time on a different grid location to specify the second node of the shell.
•Continue in a counter-clockwise direction and click a third time, and finally click a fourth time, and you will have created the first shell.
Important: Always move in either a clockwise or a counter-clockwise direction when specifying the four nodes of a shell. Moving in a crisscross pattern will generate a warped shell, which looks like two triangles. It will not function properly!
If shell numbers are not currently displayed, they can be toggled on by clicking View > Display Options > Shell Display Options > Shell Number. Notice that there is also an icon on the Quick Access Toolbar that makes this process possible without leaving the Create tab: ![]()
Click View > Query, and then click on the shell to display the Shell Info dialog. At this time, the dialog will list the nodes of the shell, along with some basic info about the shell's properties. But it won't have much additional info, because no loads have been assigned and no analysis results are available. Keep this Query function function in mind, because it can be an extremely useful way to get info about a model entity at any time.
Close the Shell Info dialog if it is still open.
Adding Shells with the Shell Data Table:
Make sure that the grid has at least four nodes displayed.
Click Tables > Shells to open the Shells table.
Notice that the table lists all shells that have been defined (if any), and it displays their nodes, along with some properties for the selected shell.
To add another shell in the current model, use the New Rows button in the lower left corner of the Shells table to add one new row. Then enter the desired nodes for the new shell, and then click OK.
Note: The methods of adding shells that we have discussed here can be thought of as the "explicit" methods. There are also methods of creating new shells that can be thought of as the "implicit" methods, such as generating shells in a pattern or meshing or duplicating shells. But we will cover all of those topics shortly.
